

Android platform includes the SQLite embedded database and provides out of the box support to use it via Android APIs. In this tutorial we shall see how to get started with SQLitedatabase in Android. SQLiteis nothing but a relational database and our SQLskills will help.
How to Use SQLite with Android?
To use SQLitein Android, a java class should be created as a sub class of SQLiteOpenHelper. This class will act as a database controller which will have the methods to perform the CRUD operations. This custom java class should override the methods named onCreate()and .onUpgrade()
onCreate() method will be called for the first time when the Android application is run. First the database instance should be created using the method like getReadableDatabase() or getWritableDatabase() based on the type of access required. Android supports this method by providing in-built methods. For that, SQLiteQueryBuilder class should be imported.
Lets have three Android Activity for List, Add and Edit operations and ensure that these are declared in manifest file. And then we need to create subclass of SQLiteHelper to manage SQLite database.
Database & Table Structure :
+------------+------------+------------------------------+---+--------+--+
| Field Name |  Field Type                   | Sample                    |
+------------+------------+------------------------------+---+--------+--+
| ID         |  PRIMARY KEY [Auto Generated] |  1                        |
| Name       |  TEXT                         | Chintan Khetiya           |
| Number     |  TEXT                         | 787-806-0124              |
| Email      |  TEXT                         | khetiya.chintan@gmail.com |
+------------+------------+------------------------------+---+--------+--+
Create or Setup Database
DatabaseHandler.java is going to be our custom java class that will manage the SQLite database. We should extend SQLiteOpenHelper and override the essential methods. The constructor is the hook that will be used to setup the database. While running the Android application, the database will be created for the first time.
public DatabaseHandler(Context applicationcontext) {
super(applicationcontext, "androidsqlite.db", null, 1);
Log.d(LOGCAT,"Created");
}
Table Creation and Upgrade
SQLiteOpenHelper provides callback methods and we should override it to get our job done. Those callback methods that we can override are onCreate(), onUpgrade(), onOpen() and onDowngrade(). And onCreate() and onUpgrade() are abstract methods and must be overridden.
onCreate(SQLiteDatabase database) – is the method which is called first time when the database is created and we need to use this method to create the tables and populate it as per the need.
@Override public void onCreate(SQLiteDatabase db) { String CREATE_CONTACTS_TABLE = "CREATE TABLE " + TABLE_CONTACTS + "(" + KEY_ID + " INTEGER PRIMARY KEY," + KEY_NAME + " TEXT," + KEY_PH_NO + " TEXT," + KEY_EMAIL + " TEXT" + ")"; db.execSQL(CREATE_CONTACTS_TABLE); }onUpgrade(SQLiteDatabase db, int oldVersion, int newVersion)– is the method called when upgrade is done. We can drop the database and reset if required.// Upgrading database @Override public void onUpgrade(SQLiteDatabase db, int oldVersion, int newVersion) { // Drop older table if existed db.execSQL("DROP TABLE IF EXISTS " + TABLE_CONTACTS); // Create tables again onCreate(db); }
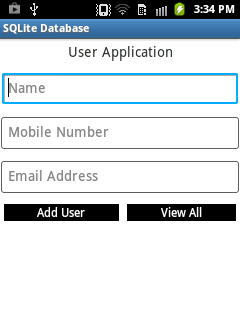
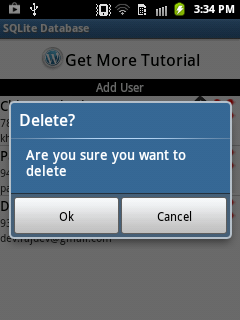
How it looks after all task ?
|
|
|
|
|
|
|

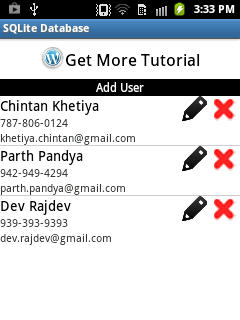
Note: The Contact details are fake or random
Do some Task : Insert, Read, Update and Delete
We shall have other user defined methods to handle the sql aobve operations. The <code>Contact table </code> will be created when the onCreate() method is invoked while installing the application. For performing operations like insert, update, the SQLiteDatabase instance should be created using the methods like getReadableDatabase() or getWritableDatabase(). ContentValues() are used to pass values to the query.
Insert Records :
// Adding new contact
public void Add_Contact(Contact contact) {
SQLiteDatabase db = this.getWritableDatabase();
ContentValues values = new ContentValues();
values.put(KEY_NAME, contact.getName()); // Contact Name
values.put(KEY_PH_NO, contact.getPhoneNumber()); // Contact Phone
values.put(KEY_EMAIL, contact.getEmail()); // Contact Email
// Inserting Row
db.insert(TABLE_CONTACTS, null, values);
db.close(); // Closing database connection
}
Read Records :
// Getting single contact
Contact Get_Contact(int id) {
SQLiteDatabase db = this.getReadableDatabase();

Cursor cursor = db.query(TABLE_CONTACTS, new String[] { KEY_ID,
KEY_NAME, KEY_PH_NO, KEY_EMAIL }, KEY_ID + "=?",
new String[] { String.valueOf(id) }, null, null, null, null);
if (cursor != null)
cursor.moveToFirst();

Contact contact = new Contact(Integer.parseInt(cursor.getString(0)),
cursor.getString(1), cursor.getString(2), cursor.getString(3));
// return contact
cursor.close();
db.close();

return contact;
}
Update Records :
// Updating single contact
public int Update_Contact(Contact contact) {
SQLiteDatabase db = this.getWritableDatabase();

ContentValues values = new ContentValues();

values.put(KEY_NAME, contact.getName());
values.put(KEY_PH_NO, contact.getPhoneNumber());
values.put(KEY_EMAIL, contact.getEmail());

// updating row

return db.update(TABLE_CONTACTS, values, KEY_ID + " = ?",
new String[] { String.valueOf(contact.getID()) });

}
Delete Records :
// Deleting single contact
public void Delete_Contact(int id) {
SQLiteDatabase db = this.getWritableDatabase();
db.delete(TABLE_CONTACTS, KEY_ID + " = ?",
new String[] { String.valueOf(id) });
db.close();
}
Read All records
// Getting All Contacts
public ArrayList<Contact> Get_Contacts() {
try {
contact_list.clear();

// Select All Query
String selectQuery = "SELECT * FROM " + TABLE_CONTACTS;

SQLiteDatabase db = this.getWritableDatabase();
Cursor cursor = db.rawQuery(selectQuery, null);

// looping through all rows and adding to list
if (cursor.moveToFirst()) {
do {
Contact contact = new Contact();
contact.setID(Integer.parseInt(cursor.getString(0)));
contact.setName(cursor.getString(1));
contact.setPhoneNumber(cursor.getString(2));
contact.setEmail(cursor.getString(3));
// Adding contact to list
contact_list.add(contact);
} while (cursor.moveToNext());
}

// return contact list
cursor.close();
db.close();
return contact_list;
} catch (Exception e) {
// TODO: handle exception
Log.e("all_contact", "" + e);
}

return contact_list;
}


Easy to Understand…
LikeLike
dude how to call these functions in main activity??
regards
LikeLike
Hello
I can’t see the error text in the field. How can I change the color of this text? Thank you
LikeLike
EditText et = (EditText) findViewById(R.id.edit1);
// to set text color using RGB code
et.setTextColor(Color.parseColor(“#00ff00”));
Have you try this ?
LikeLike
can you send me your code to this mail id. I cannot download the code.
LikeLike
You can download each of example from my Git link. https://github.com/khetiyachintan
LikeLike
With out your logcate i can’t say. please show your logcate.
LikeLike
I solved it,it was a simple misprint.
LikeLike
still learning and understanding …..
LikeLike
Hello Info Militer, Thanks for feedback appreciate it.
LikeLike
Hey there are lots of tutorials in google as you want , this is http://stackoverflow.com/questions/9109438/how-to-use-an-existing-database-with-an-android-application one of it
LikeLike
Hello, can you please give me the steps for creating the application that is which xml file and class should i create first.
Thanks
LikeLike
I think you should read some basic things about developing android application which you can learn form Android Developers. God luck
LikeLike
Hi Thank you for your link. I got the code. But in the same database if I need to add an image to the form and i’m getting the image with the help of camera activity means the image is not getting stored into the database directly, The image gets stored into the sd card and then only i have to choose it from the gallery i get saved into the database. Can you give me a solution for this? any sample code or any
improvements in the same database?
LikeLike
Do one thing , Make separate folder and save your images inside that dir. Now store that image path to database and access it. If you dont want to show your images inside gallery or want to secure your image folder then do some encoding decoding function and make it secure. That’s it.
LikeLike
Hey there, I tried to download and open up the project, and it gives me some errors that confuse me. I am unable to run it. Check out these screenshots: http://i.imgur.com/khh2iMg.png http://i.imgur.com/YqIJo8q.png http://i.imgur.com/PxDd5Dc.png thanks!
LikeLike
its simple may be you haven’ change the package name, might be that is issue.
LikeLike
Hi there would you mind stating which blog platform you’re using?
I’m looking to start my own blog in the near future but I’m having a difficult time choosing between BlogEngine/Wordpress/B2evolution and Drupal.
The reason I ask is because your layout seems different then most blogs and
I’m looking for something unique. P.S Apologies
for getting off-topic but I had to ask!
LikeLike
yeah seems your question is different to others BTW You can start with WP they will provide most different layout or templates or if you want to be a regular blogger then you should purchase or create own website theme that would be unique for you.BTW Thanks for visit my blog and comments
LikeLike
thank you so much for your useful example..
Can I use some part of it in my project?
I mean what’s its licence..?
LikeLike
Yes buddy you can. Thanks 🙂
LikeLike
nice blog
LikeLike
Thanks Buddy 🙂
LikeLike
thank’s bro, i have tried your code and i have tested and it’s worked 🙂
LikeLike
hi,how to search data from database in tis code
LikeLike
i have use array list to fetch data from database. Now use that array list. You can find out autotcomplete texview using static array and then use your dynamic array.
LikeLike
thanks for this simple tutorial..
LikeLike
This post help me a lot.. easy to understand.. But i want to show a message or prevent if again add a new user with already existing name…
is there any way to check this while we type the name on the name field?.
thanks…………..
LikeLike
Yes , As we are using List to show in Listview , use that same ArrayList and OnTextWatcher compare input text with arraylist value.
LikeLike
thank you so much ^^ *.*
LikeLike
is there any link to download complete code?
LikeLike
Yes Here it is https://github.com/khetiyachintan/SQLite-Database-Example
LikeLike
Hello Chintan.I wanted to ask you something if you could help me.I used your example as base for my project and I am stuck at the last step.How hard is to add an alert window that pops up on a specific date? Let’s say that we add a forth cell on your example what reads a text like “31/05/2014”.How can I make this alert pop on the specific date with a message like “You have to respond to the X email today”,where X is the email of the specific table.Thanks in regard.
LikeLike
Mean , you want to save some Date & Time into database and when that day comes in future you want to show some dialog ?? is it show ? Then you need to store one date & time in database and use alarm manager class to callback that specific event in upcoming days.
LikeLike
Nice work ..howewer the update method is not working… I dont know why..can anybody give a heads up??
heres how i am updating my contacts/data
List cts = db.getAllContacts();
for (Contact cn : cts)
{
cn.setName(“ddd”);
cn.incrementattend();
Log.d(“ffff”, cn.getATT()+””);
db.updateContact(cn);
}
i am using the same code for updation,creation etc as posted above
LikeLike
Hey I am so thrilled I found your webpage, I really found you by accident, while I was browsing
on Askjeeve for something else, Nonetheless I am here now and would just like to say many thanks for a tremendous post and a all round interesting blog (I also love the theme/design), I don’t have time to read through it all at
the minute but I have saved it and also included your RSS feeds,
so when I have time I will be back to read more,
Pleaase do keep up the awesome work.
LikeLike
Hi tto all, it’s actսally a pleasant for me to pay ɑ visit
tɦis web ρage, itt contains valuable Іnformation.
LikeLike
Thanks for your feedback 🙂
LikeLike
Pretty nice post. I just stumbled upon your weblog and
wished to say that I have really loved surfing around your blog posts.
In any case I will be subscribing to your rss feed and I am hoping you write again very
soon!
LikeLike
hii i am developing quiz application my question is how to fetch questions and its option from the sqlite database to arraylist
LikeLike
Nice Post
Easy to understand
LikeLike
Every weekend i used to pay a visit this web page, for the reason that i wish for enjoyment,
as this this web page conations actually
fastidious funny material too.
LikeLike
I like looking through a post that can make men and women think.
Also, thank you for permitting me to comment!
LikeLike
We’re a gaggle of volunteers and opening a brand new scheme in our community.
Your website offered us with helpful information to work on. You have
done an impressive job and our whole neighborhood might be thankful to you.
LikeLike
Make a tutorial on: Image selection from camera or gallery and save it to database
LikeLike
Hi Sir, thank you so much for this tutorial. This helps me a lot on my android project. But right now, I have some difficulties in understanding some topic about the database. Can you also create a detailed tutorial about foreign keys in android? Please. Please. This will be a great help for us, I know its too much but I just badly need it.
Thank you so much sir.
LikeLike
Thanks
Very nice, understandable and easy.
Regards
Viral
LikeLike
hi chintan it is excellent tutorial it helped me a lot i have one regarding adding one more column how can i do that if possible explain please
LikeLike
Thank you to help
LikeLike
Hello Kha, Thanks for your feedback appreciate it.
LikeLike
Your Edit text for mobile number is taking only 8 characters input. May be because you have specified maxLength=”10″ ; and in api 21 mobile: mobile number is shown as (987) 654-32 ,which includes ‘()’, ‘a blank space and a ‘-‘ .Which eat up the space and make it of 8 characters.
LikeLike
Hi Bhunika, Thanks for your comment it’s true. We need to change length as per requirement
LikeLike